Replacing Music Streaming Services with a Self-hosted Stack
Replacing TV and movie streaming services is pretty trivial, and typically one of the first projects for any new self-hoster, but music streaming services are a whole different beast. There's a growing need to replace the likes of Spotify, but there's no one-size-fits-all solution, and maintaining an on-disk music library will always be a lot of manual work. That being said, I've put together a stack that I'm happy with for now, and there was some interest in the full details, so I'll try to slap together a tutorial here.
Full disclosure, I'm far from an expert, and I've only been running my own home server for about 4 months now, and I'm not exactly great at writing tutorials, but here we go.
This also assumes you already have a reverse proxy of your choice set up for your server and understand docker. I'll briefly cover Caddy and Pangolin configurations, but anything else is past what I know.
Breakdown
We can break down a music streaming service to the following requirements:
- A backend library management service
- Syncing files, playlist handling, multi-user support, etc
- Media player compatibility (desktop, web, mobile)
- Remotely accessible
- Metadata management
- Ability to find artists, albums, and tracks and add them to the existing library
- High quality lossless formats preferred
- A “discovery” service to find new, similar music
With this list in mind, my stack consists of the following services:
- Backend: Navidrome
- Jellyfin works fine too, but I prefer Navidrome, though I do share my library with Jellyfin too just because
- Media players: Feishin and Symfonium
- Remote access: Pangolin
- Anything works here really. Tailscale, Wireguard, your choice.
- Metadata management: beets, Lidarr, and Metadata-Remote
- Search and downloading: Lidarr, slskd, and Tubifarry
- Discovery: Explo with Listenbrainz
- Each user should have a Listenbrainz account and a last.fm account
Regarding File Permissions
This setup runs services as non-root users whenever possible. Navidrome will run as 1005:1005 and only needs read access to the library, while slskd, lidarr, and metadata managers will run as 910:910 with read/write access to both the library and the download directory.
If you're brave and/or stupid, you can just run everything as root by removing the “user” properties in the compose files, but please don't do that.
To set permissions properly, run the following, changing directories to match your setup:
# Library
sudo chown -R 910:910 /music
sudo chmod -R 664 /music

# Downloads
sudo chown -R 910:910 /downloads/slskd
sudo chmod -R 664 /downloads/slskd
This sets user 910 as the owner of both folders, with read/write access, while also giving read access to all users.
Navidrome
Navidrome
Navidrome is the core of the stack, handling our library sync, users, and of course playback and streaming. Technically, Navidrome can also be used as a media player on its own, but the UI is honestly kind of ugly and clunky - we'll be connecting it to Feishin and Symfonium instead.
Taking a step back, we need to structure our library folders. My library sits on my unRAID NAS, and my entire system is designed for 2 users. My directories for a 2-user system look something like this:
/media
	/music
		/kiryu
		/majima
		/discovery
			/kiryu
			/majima
		/shared
Is this ideal? Probably not. Does it work for me? Sure. The important part is that both users have a main library folder, as well as a discovery folder (we'll get to this later), and the discovery libraries are separate from the primary libraries. The “shared” folder is where I manually place music files that both users want access to, just to save some storage space.
With that being said, our Navidrome docker compose file looks something like this:
navidrome:
   container_name: navidrome
   image: deluan/navidrome:latest
   env_file: .env
   user: 1005:1005 #Navidrome should be run as its own user and only needs read access to its volumes
   ports:
     - 4533:4533
   restart: unless-stopped
   networks:
     proxy:
       ipv4_address: 172.16.0.5
   volumes:
     - ./appdata/navidrome:/data
     - ./appdata/navidrome/temp:/music #Important, see below
     # Change these volumes accordingly to something that makes sense to you.
     # Each user should have a library folder and a discover folder
     # Note the right-side paths don't stem from "/music". This is because Navidrome by default adds the "/music" path
     # to all users' libraries, and this cannot be removed. This is also why we map /music to an empty directory above.
     - /mnt/unraid/media/music/kiryu:/kiryu/music
     - /mnt/unraid/media/music/discover/kiryu:/kiryu/discover
     - /mnt/unraid/media/music/majima:/majima/music
     - /mnt/unraid/media/music/discover/majima:/majima/discover
     - /mnt/unraid/media/music/shared:/shared
Our .env file for Navidrome is as follows:
ND_LASTFM_ENABLE="True"
ND_LASTFM_LANGUAGE="EN"
ND_LASTFM_APIKEY="your key here"
ND_LASTFM_SECRET="your secret here"
ND_SPOTIFY_ID="your id here"
ND_SPOTIFY_SECRET="your secret here"
ND_IGNOREDARTICLES="The El La Los Las Le Les Os As O A"
ND_IMAGECACHESIZE="2500MB"
ND_TRANSCODINGCACHESIZE="9000MB"
ND_COVERARTPRIORITY=albumart.*, cover.*, folder.*, front.*, embedded, external
ND_PASSWORDENCRYPTIONKEY="a strong encryption key here"
ND_ADDRESS=172.16.0.5
ND_BASEURL=https://navidrome.example.com
ND_AUTHWINDOWLENGTH="30s"
# If you want to configure reverse-proxy authentication with something like Authentik or Authelia on top of it,
# set these values. I'll be briefly going over this but it's not mandatory.
ND_REVERSEPROXYUSERHEADER="Remote-User"
ND_REVERSEPROXYWHITELIST="192.168.1.0/24,172.16.0.0/24"
You've probably already noticed the LastFM and Spotify values. These are optional, but obtaining metadata. LastFM scrobbling will be set up on the user profile page; the environment values are just for metadata and images.
Follow Navidrome's documentation to obtain these values: https://www.navidrome.org/docs/usage/external-integrations/
Navidrome's password encryption adds a nice bit of extra security to your service, but read the documentation to understand exactly what it does: https://www.navidrome.org/docs/usage/security/
[!NOTE]
To be able to keep compatibility with the Subsonic API and its clients, Navidrome needs to store user’s passwords in its database. By default, Navidrome encrypts the passwords in the DB with a shared encryption key, just for the sake of obfuscation as this key can be easily found in the codebase.This key can be overridden by the config option
_PasswordEncryptionKey_. Once this option is set and Navidrome is restarted, it will re-encrypt all passwords with this new key. This is a one-time only configuration, and after this point the config option cannot be changed anymore or else users won’t be able to authenticate.
Start up Navidrome with sudo docker compose up -d and set up your admin user: https://www.navidrome.org/docs/getting-started/
The initial library will be empty if you followed the pathing above. That's intentional, as the admin is just going to be used for configuration purposes.
Authentication
Do this after you start up Navidrome once and set up the admin user.
I believe this should create users automatically as necessary, but just in case, you may want to create your regular user(s) now from the Navidrome admin control panel, ensuring they have the same usernames as your OIDC user(s).
In my setup, I use Navidrome's reverse proxy authentication in conjunction with Caddy and Authentik. This isn't required at all, and does complicate the setup a fair bit, but if you plan to expose Navidrome publicly, then I would suggest implementing this. This is basically just for the Navidrome UI itself, and media player integrations will still use basic auth. If you plan to expose Navidrome, the rest endpoint will be fully exposed, so ensure your users have very secure passwords.
This setup uses the forwardAuth method which both Authentik and Authelia support, and I imagine most OIDC providers have their own versions of this. I won't be going into detail here on configuring this.
My Caddyfile for an Authentik configuration looks something like this:
*.example.tld {
		#Navidrome
        @navidrome host navidrome.example.com
        handle @navidrome {
                @protected not path /share/* /rest/* #Required, these paths need to be accessible via basic auth
                forward_auth @protected 192.168.1.50:9000 {
                        uri /outpost.goauthentik.io/auth/caddy
                        copy_headers X-Authentik-Username>Remote-User
                }
                reverse_proxy 192.168.1.50:4533
        }

        # Navidrome URL for password auth, meant for admin use since I'm too lazy to assign an OIDC user to my admin
        @navi-admin host navi-admin.example.com
        handle @navi-admin {
                reverse_proxy 192.168.1.50:4533
        }
}
Of course, replace 192.168.1.50 with your server's private IP or docker container names. Up to you. The second domain there is entirely just out of laziness. My 2 users aren't admins, but I still want to be able to access the admin controls as necessary, so I just do it this way. Is it a good solution? Probably not. Oh well.
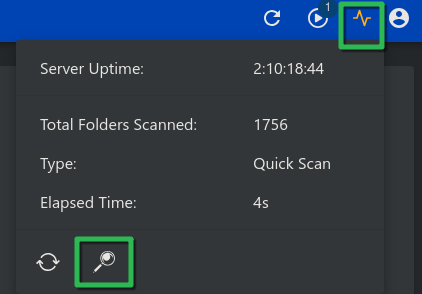
Library Setup
From the Navidrome admin control panel, set up your libraries:
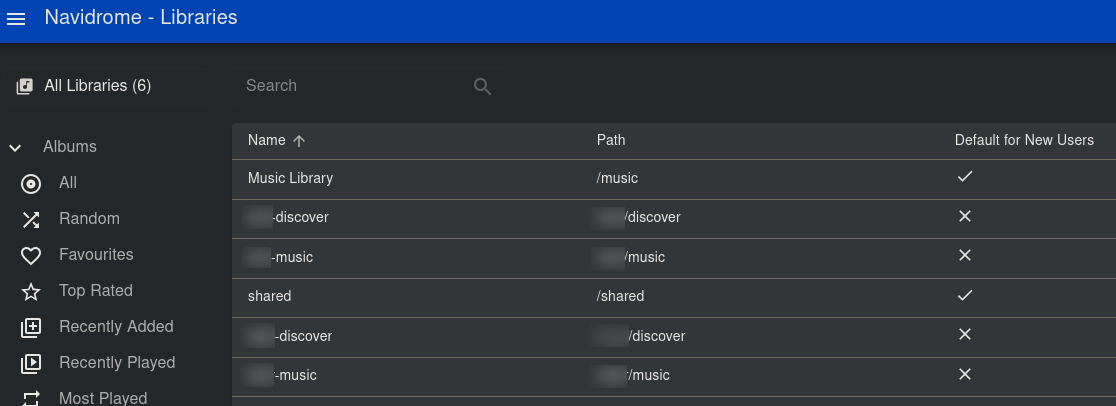
Then for each user, assign them to their respective libraries:

Quick, easy, done. If you already have music in your folders, you can kick off a full scan now:
And that's pretty much the entirety of the Navidrome setup. Next, we'll connect it to our media players.
Media players
Feishin
My desktop and web player of choice is Feishin. Feishin is highly customizable, easy to set up, and available across platforms.
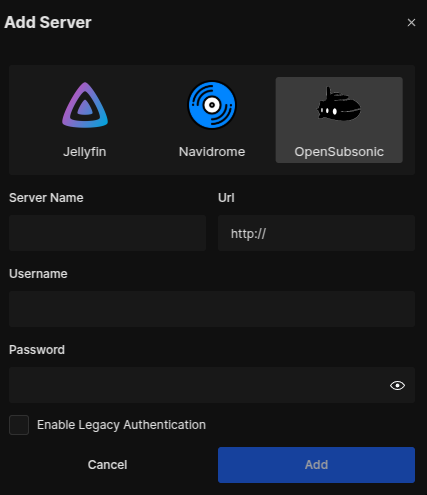
Adding a server to Feishin is trivial. When launching the desktop app or web player, you just enter in your server details and user credentials.
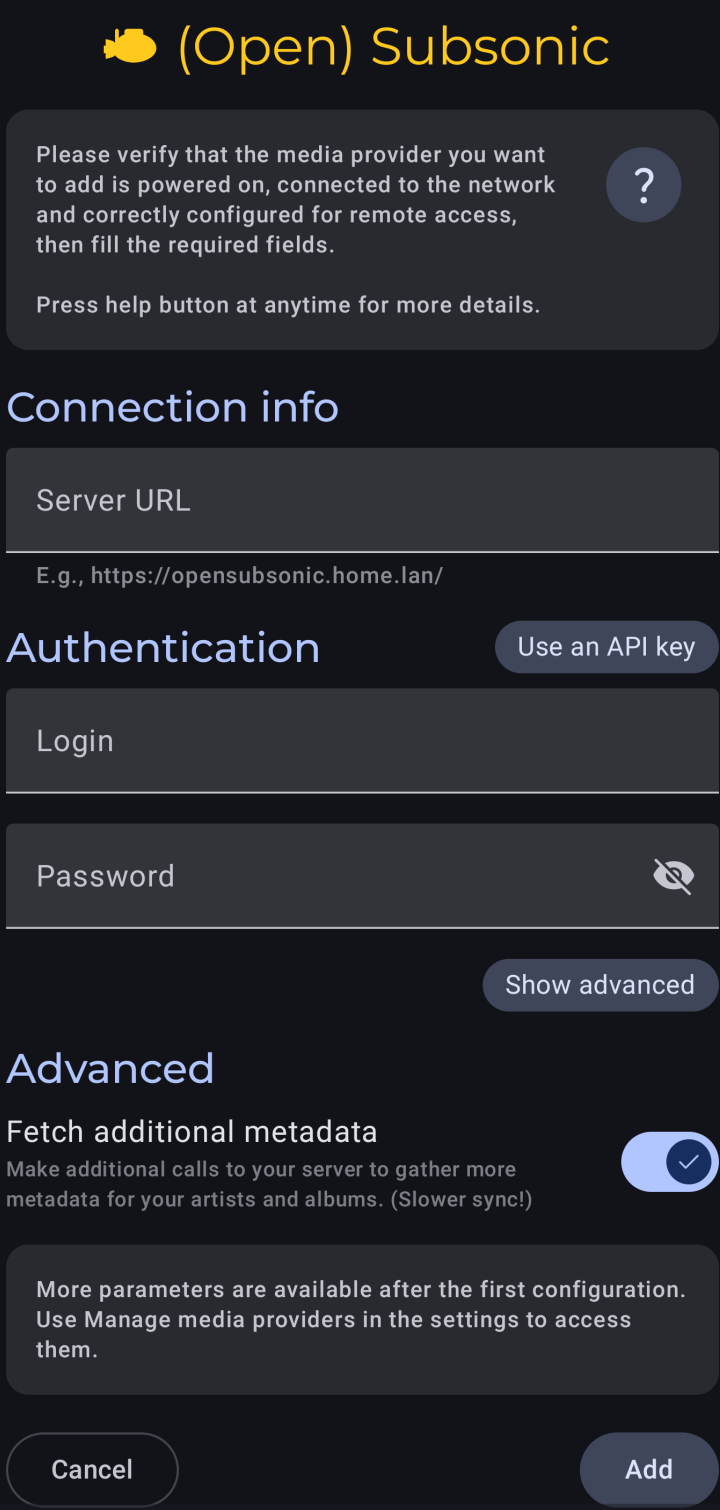
Note that if you use reverse proxy authentication, you must set up your Navidrome server under OpenSubsonic instead:
My compose file for a Feishin web client is almost identical to the official example. The “SERVER_” environment variables set the default server settings, which are a nice convenience if you don't plan to connect this instance to any other server.
feishin:
    container_name: feishin
    image: ghcr.io/jeffvli/feishin:latest
    environment:
      PUID: 1005
      GUID: 1005
      SERVER_LOCK: true
      SERVER_TYPE: subsonic #subsonic if using reverse proxy auth, navidrome otherwise
      SERVER_NAME: my_navidrome_server
      SERVER_URL: https://navidrome.example.com
    networks:
      int:
        ipv4_address: 172.16.0.6
    ports:
      - 9180:9180
    restart: unless-stopped
Symfonium
Symfonium is widely regarded as one of the best Navidrome-compatible Android media players. It's unfortunately a $6 closed source app, but oh well.
Unfortunately for iOS users, I have zero knowledge of iOS and have no idea what compatible apps are good, so do some research.
To connect Symfonium to your Navidrome service, simply add it as an OpenSubsonic connection:
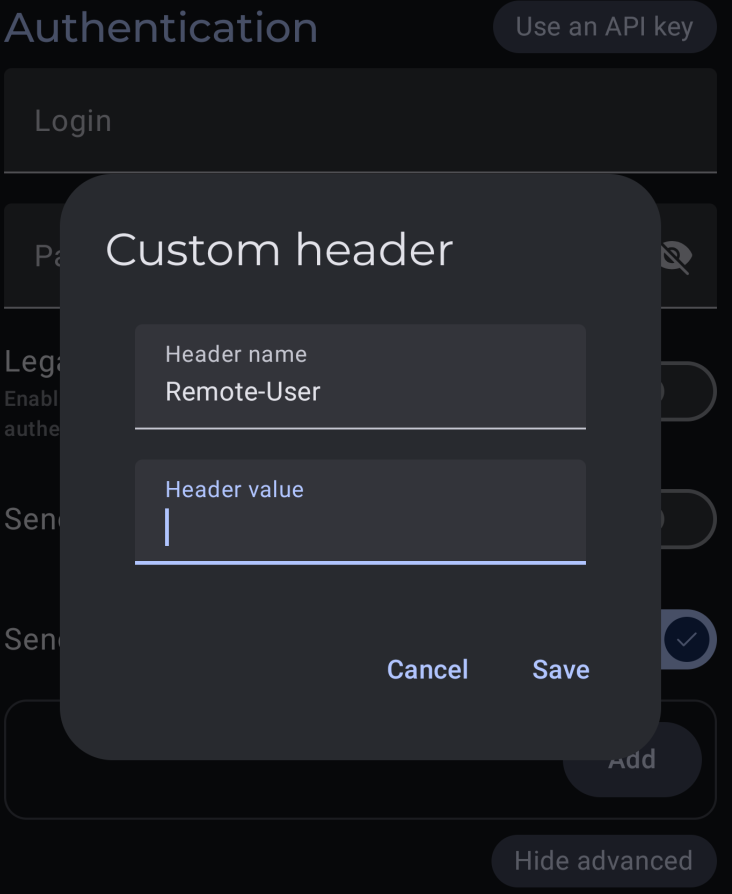
If you're using reverse proxy authentication, you'll need to set a custom header for “Remote-User” with your username as the value:
Remote Access
I won't be covering this in too much detail here - I'm going to assume you already have some sort of remote access solution for your server.
Remote access options aren't much different than any other service. Pangolin, Wireguard, Tailscale, Netbird, whatever works for you will work here all the same. I opted to expose both Navidrome and Feishin via Pangolin, as my wife wanted to be able to connect to it from her work machine in the office, so I've outlined some details on this setup below.
If you're not already using Pangolin, you can just ignore all of this and figure out your own setup.
The Pangolin configurations for both services are very standard, with Pangolin's authentication enabled (which in my case utilizes Authentik). There is one catch:
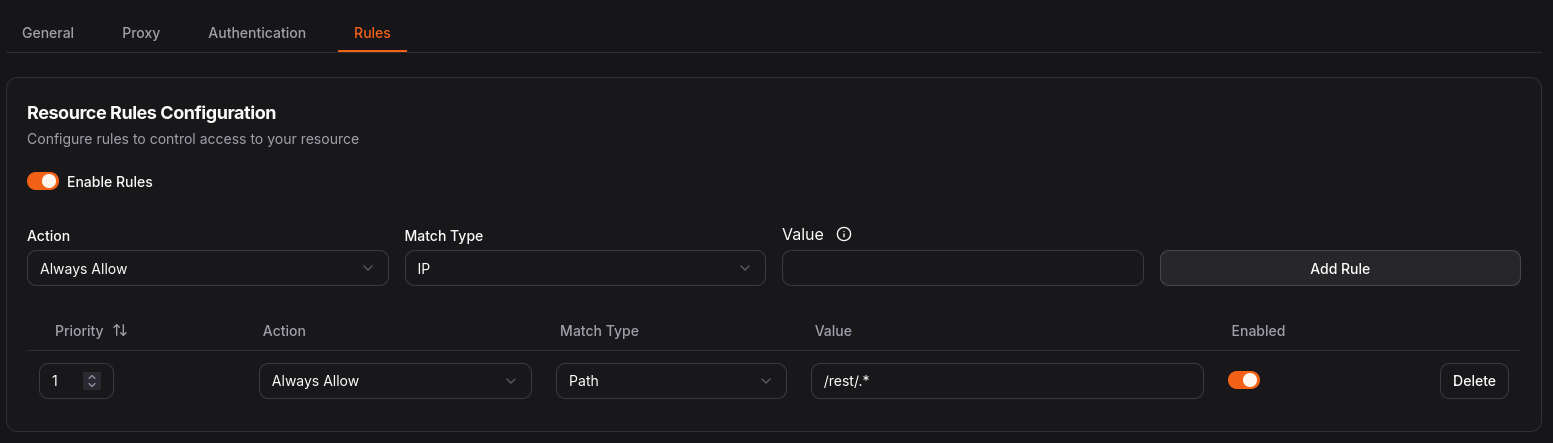
If you want to connect to Navidrome from any media player (i.e. exposed Feishin web instance, Symfonium, etc), you need the /rest/.* endpoint to be available, bypassing Pangolin's auth. Navidrome has read-only access to its files, and the entire API requires basic auth to use (to my knowledge), so ensure your users have extremely strong passwords, and always remember public exposure carries a level of risk.
The Lidarr Stack
Setting up the actual music server is the easy part, but where things start to get more complex is managing and populating the library.
As I mostly listen to full albums and prefer lossless formats, Lidarr works great for me, but those who prefer individual tracks may want to look into other options such as Spotizerr.
Preface
SUPPORT YOUR FAVORITE ARTISTS
We all know what slskd is for. Streaming services like Spotify pay out artists a fraction of a penny per play. Getting their music over p2p file shares pays even less, obviously. Massive household names and millionaire artists? Sure, whatever, who cares. But please support your favorite smaller artists - buy their music directly off of Bandcamp or similar sources, buy their merch, whatever. Every bit goes a long way.
slskd
slskd is my tool of choice for “obtaining” new music. slskd is a client for the Soulseek p2p file-sharing network. Pretty simple to use and setup. I'm not going to cover this too in-depth because it's very well-documented already.
While the compose file in the official setup guide works fine out of the box, I highly suggest routing slskd through a VPN. To do that, we'll be using a Gluetun container. If you've already set up Sonarr/Radarr/etc, you've very likely already done this before.
[!NOTE]
To use Gluetun, you'll need configuration details (preferably a Wireguard config) from a VPN provider. If you don't already have one, I suggest Mullvad or Proton.
My slskd compose file looks something like this:
services:
  gluetun:
    container_name: gluetun-slskd
    hostname: gluetun-slskd
    image: qmcgaw/gluetun:latest
    cap_add:
      - NET_ADMIN
    devices:
      - /dev/net/tun:/dev/net/tun
    environment:
    	# All of this info comes from your VPN provider's configuration file
      - VPN_SERVICE_PROVIDER=change this
      - VPN_TYPE=wireguard
      - WIREGUARD_PRIVATE_KEY='change this'
      - WIREGUARD_ADDRESSES=change this
      - SERVER_COUNTRIES=change this
      - DNS_ADDRESS=change this
   ports:
      - 5030:5030 #slskd
      - 5031:5031 #slskd
      - 50300:50300 #slskd
    restart: always

  slskd:
    image: slskd/slskd:latest
    container_name: slskd
    network_mode: service:gluetun
    user: 910:910 # Optional, if you don't want to run as root. Don't use the same user as Navidrome.
    environment:
      TZ: America/New_York
      SLSKD_REMOTE_CONFIGURATION: true
      SLSKD_REMOTE_FILE_MANAGEMENT: true
      SLSKD_SHARED_DIR: /data # This sets a default, but we'll add other users in the slskd config
      SLSKD_DOWNLOADS_DIR: /downloads/complete
      SLSKD_INCOMPLETE_DIR: /downloads/incomplete
      SLSKD_UPLOAD_SPEED_LIMIT: 500
      SLSKD_UMASK: 000
    volumes:
      - ./appdata/slskd:/app
      - /downloads/soulseek:/downloads
      - /music/kiryu:/data # Mount each user's library as a different directory. These are only used for uploads/shares.
      - /music/majima:/data2
      - /music/shared:/data3
    restart: unless-stopped
    depends_on:
      gluetun:
        condition: service_healthy
Once you've got slskd spun up and ideally running through your reverse proxy, UI is pretty straightforward. The default username and password are slskd / slskd.
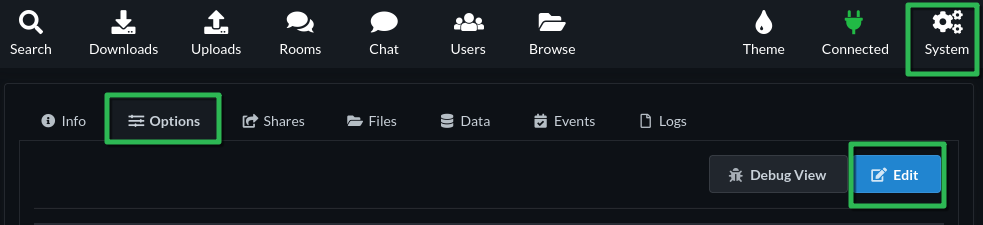
We do need to finalize our configuration though. Go to System → Options → Edit, replace the contents with something like this based on your own preferences, changing whatever values you need to. Read up on the slskd documentation for more details.
remote_configuration: true
debug: true

directories:
  incomplete: /downloads/incomplete
  downloads: /downloads/complete

shares:
  directories:
    - /data
    - /data2
    - /data3

global:
  upload:
    slots: 5
    speed_limit: 1000
  download:
    slots: 500

groups:
  default:
    upload:
      slots: 5
    limits:
       queued:
         files: 100
         megabytes: 15000
       weekly:
         files: 100
         megabytes: 15000

web:
  authentication:
  	# If you put slskd behind a forwardAuth, you can set "disabled" to true and remove the username/password fields
    disabled: false
    username: webui-username
    password: webui-password
    api_keys:
      my_api_key:
        key: any-32-char-alphanumeric-value-here

soulseek:
  # There's no registration process for slskd, set a username and password here. You can change these at any time.
  username: any-username-here
  password: strong-password-here
Lidarr
Lidarr is probably the best tool in the music management space at the moment, but it's a bit of a behemoth, and the sonarr/radarr structure doesn't lend itself well to music if you're looking for individual tracks and not full albums. In my case, I prefer full albums, while my wife prefers single tracks, so I've learned a fair bit about how to adjust this tool to my needs.
- You're going to want one Lidarr instance per user
- Lidarr doesn't support multiple libraries, and mashing it all together will be a nightmare to clean up.
- Focus on setting up one instance at a time.
- Lidarr's metadata server has been broken for months now. Luckily, the hearring-aid branch provides an alternative solution.
- For plugin support, you'll need to use a compatible docker image
- There are several methods available to connect to slskd, but the reason we chose the plugin branch here is to use the Tubifarry plugin.
First things first, let's get Lidarr up and running. Our example is using 2 users, so let's spin up 2 instances.
lidarr:
    image: blampe/lidarr:lidarr-plugins-2.13.1.4678
    container_name: lidarr
    environment:
      PUID: 910
      PGID: 910
      TZ: America/New_York
    ports:
      - 8686:8686
    volumes:
      - ./appdata/lidarr:/config
      - /music/kiryu:/data
      - /music/shared:/shared
      - /downloads/soulseek:/downloads
      - ./appdata/backups/lidarr:/backups # Lidarr runs automated backups like Sonarr/Radarr. Nice to have
    restart: unless-stopped
When we add more instances later for each user, we just need to change the directories and naming a bit to differentiate. Set this up however you like, as long the names, directories, and ports are different from the first instance.
lidarr-majima:
    image: blampe/lidarr:lidarr-plugins-2.13.1.4678
    container_name: lidarr-majima
    environment:
      PUID: 910
      PGID: 910
      TZ: America/New_York
    ports:
      - 8687:8686 #Note the leftside port change
    volumes:
      - ./appdata/lidarr-m:/config
      - /music/majima:/data
      - /music/shared:/shared
      - /downloads/soulseek:/downloads
      - ./appdata/backups/lidarr-m:/backups # Lidarr runs automated backups like Sonarr/Radarr. Nice to have
    restart: unless-stopped
Do this for however many users as you need. I really wouldn't go over 3, maybe 4 tops. More users = more load, and more work for you.
When you first start up Lidarr, you'll be walked through the initial setup. Set whatever you like here:
[!NOTE]
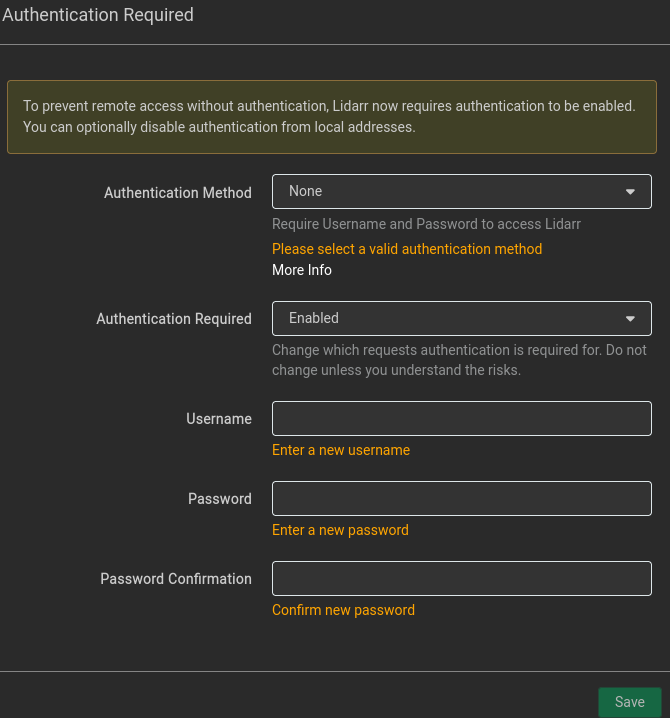
If you want to disable authentication (for example, if you have an Authentik or Authelia forwardAuth in front of Lidarr in your reverse proxy), you can set<AuthenticationMethod>External</AuthenticationMethod>in Lidarr's config.xml file
You'll then be prompted to add a root folder. We have 2 root folders we want to add in each instance: /data and /shared. But before we do that, let's a quality profile. Personally, I prefer lossless whenever possible, but sometimes a lossless version of the album you're looking for just doesn't exist. So let's set a profile that prefers lossless, will grab lower qualities if it can't find it, and automatically search for upgraded versions periodically. This is entirely up to you and your own preferences (and perhaps even each user's preferences).
On the left panel, go to Settings → Profiles and add a new Quality Profile:
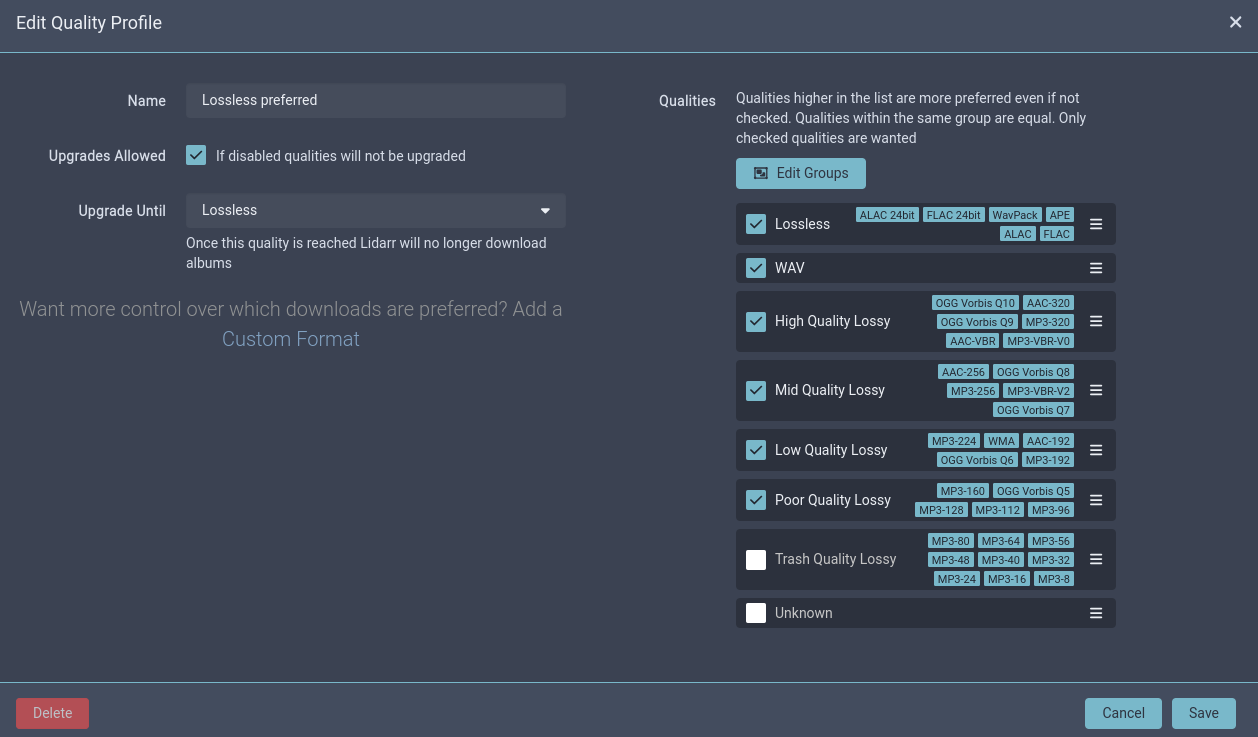
If you're wondering why some screenshots are blue, these are taken from my personal instance which uses Theme-Park, while the grey ones are a new instance I spun up for this tutorial, and I'm too lazy to create all my profiles and such in the new instance.
This will be our default profile going forward.
While on the Profiles page, we can also set a Metadata profile. Personally, I removed the default profile, and created these two:
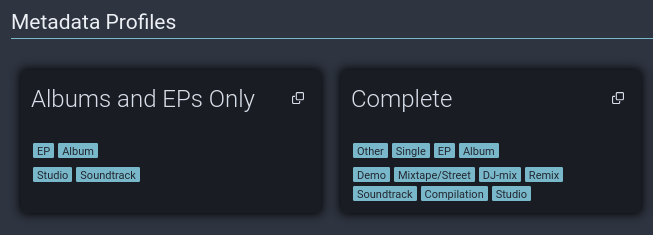
I don't usually use the “Complete” profile, but it's useful to have for artists that have a lot of random singles and such that I want to track down.
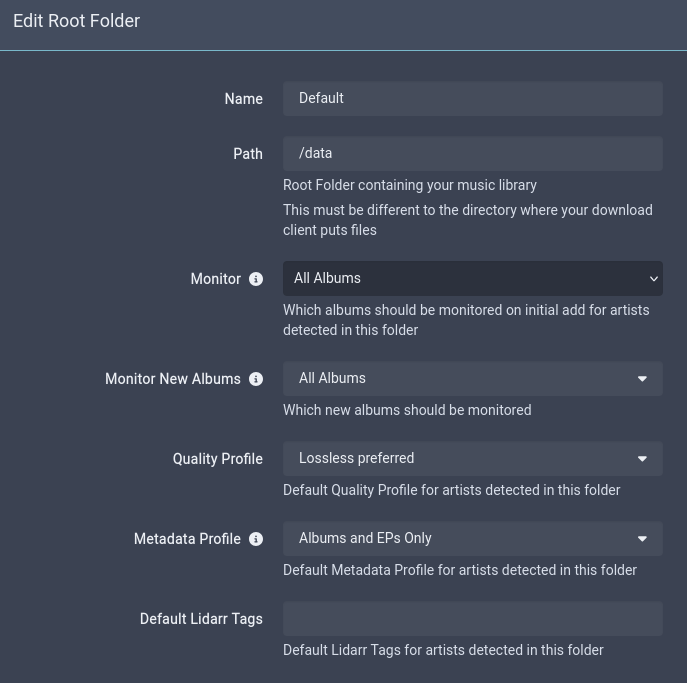
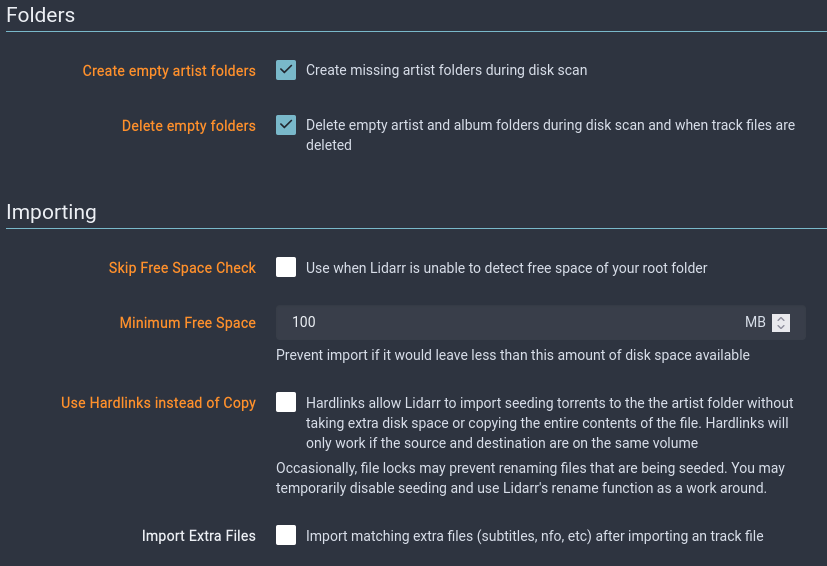
Now let's set our root folders. In our example, our user has their own folder, and we have the shared library folder, where we'll manually move music to that's shared by multiple users, just to save some space. This is totally optional, and if you have plenty of storage space, you can skip the shared folder entirely.
If you've used Sonarr or Radarr before, you're already familiar with the Monitoring concept. If not, it just means which releases are being actively tracked and searched for by the tool. Monitored releases will also be continuously upgraded if we used a quality profile like the one above. Set these to your own preferences.
Set up the /shared folder in the same way.
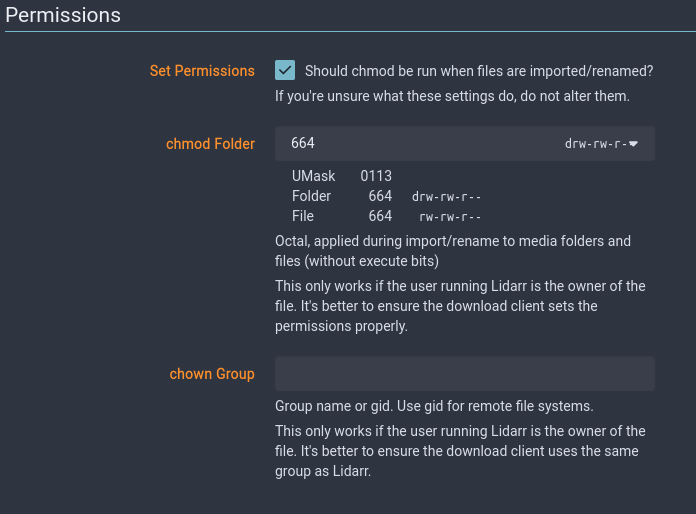
If you enabled the Advanced settings (the gear icon at the top of this page), you can fine-tune your folders and track name settings. Most of these are self-explanatory, set them as you see fit:
Tubifarry
Next, let's add the Tubifarry plugin to connect Lidarr to slskd. The instructions below are copied from the Tubifarry github:
- In Lidarr, go to
System -> Plugins. - Paste
https://github.com/TypNull/Tubifarryinto the GitHub URL box and click Install. - Navigate to
Settings -> Indexersand click Add. - Select
Slskdfrom the list of indexers. - Configure the following settings:
- URL: The URL of your Slskd instance (e.g.,
http://localhost:5030). - API Key: The API key for your Slskd instance (found in Slskd's settings under 'Options').
- Include Only Audio Files: Enable to filter search results to audio files only (beta).
- URL: The URL of your Slskd instance (e.g.,
- Go to
Settings -> Download Clientsand click Add. - Select
Slskdfrom the list of download clients. - Set the download path where downloaded files will be downloaded.
And that's it. Everything is hooked up. Next, let's take a quick tour of Lidarr. Search for an artist at the top of the page, give the search a moment to load, find your artist, and click “Add”. Leave the default settings, unless you want to tweak them a bit.
Once the metadata search completes, you'll be able to view the artist page and see something like this:
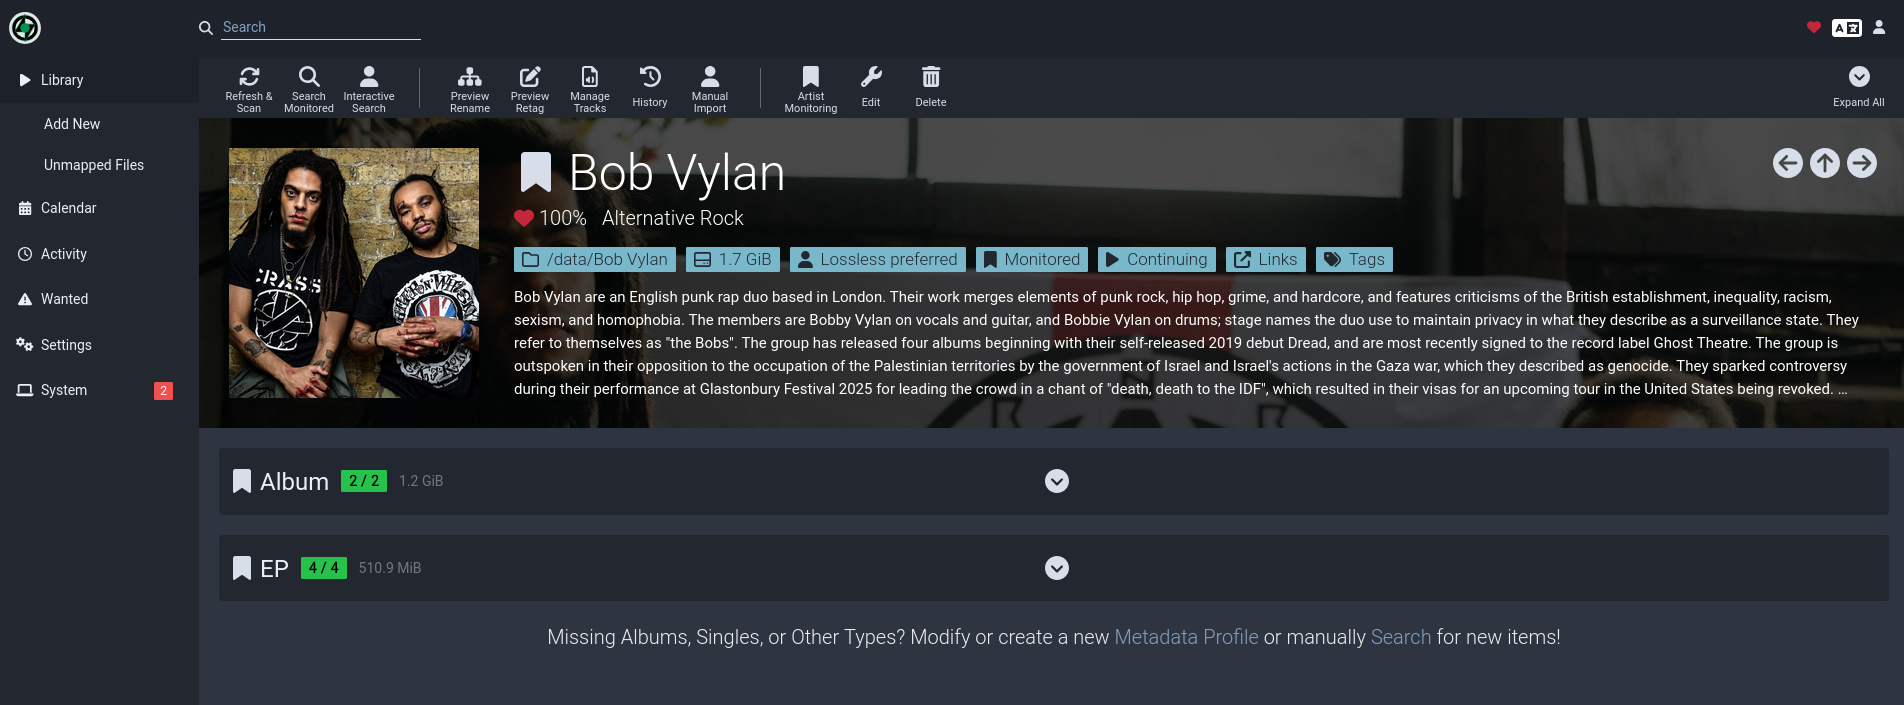
From here, expand the tabs, and click the banner icons on the left to monitor and unmonitor releases of your choosing. Just like Sonarr/Radarr, Lidarr will then automatically kick off searches for the monitored releases, only it'll go through slskd rather than a torrent client.
Import Lists
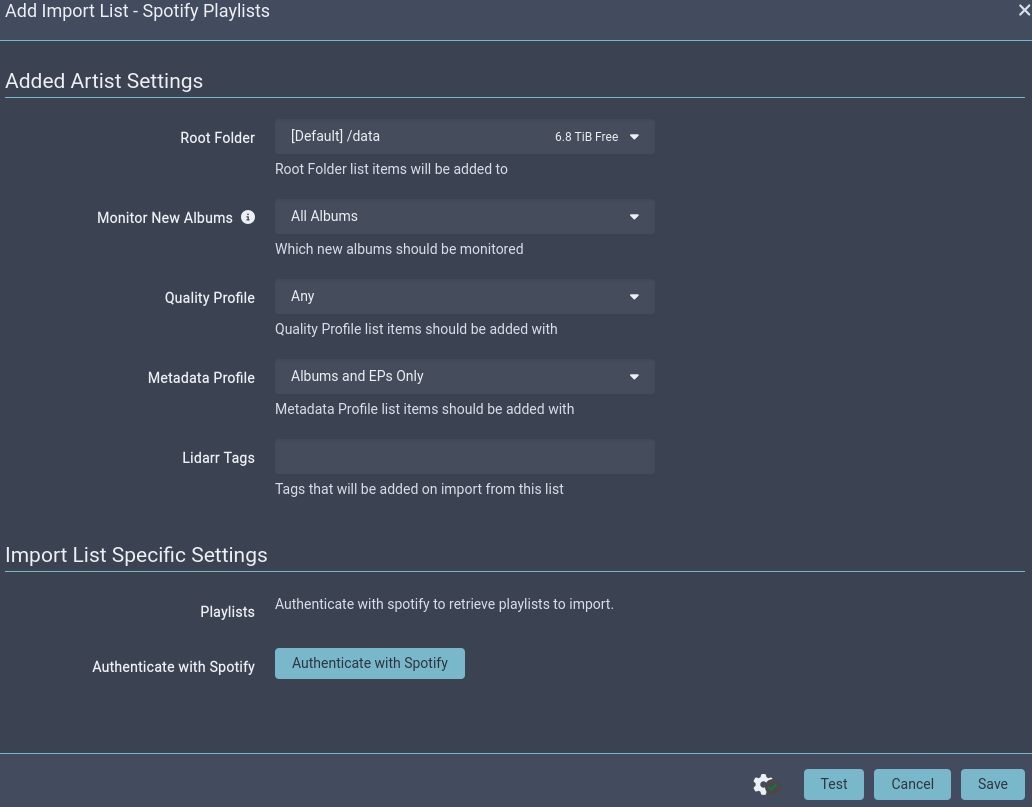
Lidarr also has the ability to import collections from various sources, such as Spotify playlists. You can also import last.fm's Recommended tracks, though I prefer to do this via Explo and ListenBrainz (more on that later).
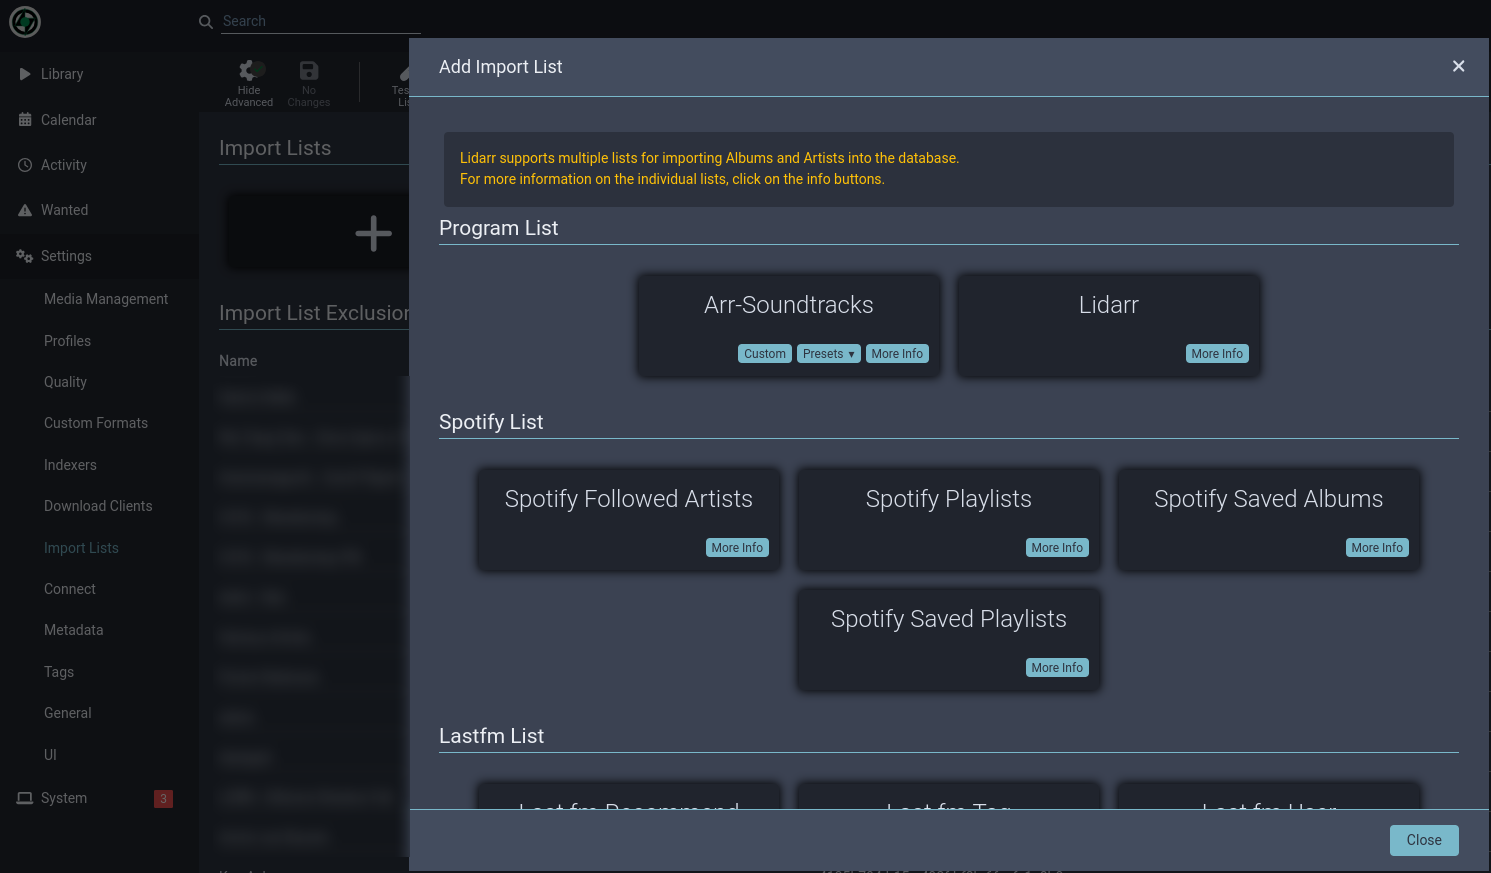
The import list feature is very self-explanatory. Go to Settings → Import Lists, and add your list.
For most services, you'll be asked to Authenticate when saving the list. Set your monitor and quality profile settings to your liking, connect/authenticate, and let Lidarr work its magic.
Workarounds
Unfortunately for those who prefer individual tracks, Lidarr is heavily geared toward full album listeners. Individual tracks cannot be monitored in a single release:

My solution for this for my wife's Lidarr instance is hacky and manual but functional. I'll monitor the entire album, then once it's added to the library, I'll unmonitor the album then manually go in and delete the unwanted tracks. It's not the cleanest solution, but it works.
Alternatively, you can always download and import individual tracks directly from slskd. While this skips Lidarr entirely, Lidarr will automatically pick up any additions to your library. As such, you may want to set your root folder settings (Settings → Media Management) to Unmonitored by default.
I've also run into a mildly bizarre and annoying quirk with Lidarr. I have one track in my library with a specific featured artist, and no matter how many times I tried to remove this artist, Lidarr would add them back again and start searching for their releases. My “solution” for this was to keep the artist in my Lidarr library, but completely unmonitor them - that way, nothing new would get added and searched for, and the only downside is that they appear in my Lidarr list. A bit annoying, but not the end of the world.
Metadata and Manual Imports
Not all of your music will come from Lidarr (for example, the vast majority of screenshots in this guide are of albums I've bought off Bandcamp). Plus you may not be happy with the automatic metadata tagging that Lidarr performs when adding tracks. That's where metadata management tools come into play.
I use beets for the bulk of this, and metadata-remote for touch-ups as need be.
beets
beets is a command-line tool that offers advanced metadata management. Personally I find it extremely useful for importing music downloaded off Bandcamp or other sources, and for maintaining my library folder structure. if you want to just drop your files into your library manually and let Lidarr handle it, that's fine too, but personally I find Lidarr lacking in the metadata department.
The beets compose setup is very simple. There may be other docker images out there, but I've been getting by just fine with the linuxserver image:
beets:
   image: linuxserver/beets:latest
   container_name: beets
   environment:
     PUID: 910
     GUID: 910
   volumes:
     - ./appdata/beets:/config
     - /mnt/unraid/media/music/kiryu:/music
     # beets is very useful for importing manual downloads from slskd, so map your downloads folder
     - /downloads/soulseek/complete:/slskd
     # Map a temp directory (call it whatever you like) for importing other files manually.
     - /mnt/unraid/temp/music:/tempmusic
   ports:
     - 8337:8337
   restart: unless-stopped
You may be to able to configure beets to run with different libraries, I haven't looked into it, but the container is so lightweight that I just run a second instance pointed to my second user's folder.
You can either let beets create its config file on first startup then modify it (/config in the container), or create one now. beets is highly configurable, so do some reading and change this as you like. This is mine:
plugins: fetchart embedart convert scrub replaygain lastgenre chroma web duplicates inline rewrite substitute
directory: /music
library: /config/musiclibrary.blb
art_filename: albumart
threaded: yes
original_date: no
per_disc_numbering: no

convert:
    auto: no
    ffmpeg: /usr/bin/ffmpeg
    opts: -ab 320k -ac 2 -ar 48000
    max_bitrate: 320
    threads: 1

paths:
    default: %substitute{$albumartist}/$album ($year)/$track - $title
    singleton: %substitute{$albumartist}/Singles/$title

import:
	# Change these as you like, refer to the beets documentation.
	# I prefer beets to move my files out of the imported directory into my library.
	# Copying is safer but I'm lazy.
    write: yes
    copy: no
    move: yes
    resume: ask
    incremental: yes
    quiet_fallback: skip
    timid: no
    log: /config/beet.log
    languages: en

lastgenre:
    auto: yes
    source: album

embedart:
    auto: yes

fetchart:
    auto: yes

replaygain:
    auto: no

scrub:
    auto: yes

replace:
    '^\.': _
    '[\x00-\x1f]': _
    '[<>:"\?\*\|]': _
    '[\xE8-\xEB]': e
    '[\xEC-\xEF]': i
    '[\xE2-\xE6]': a
    '[\xF2-\xF6]': o
    '[\xF8]': o
    '\.$': _
    '\s+$': ''

# These 2 sections are optional. I use substitute/rewrite to maintain single-artist Album Artist tags and folder names,
# and to localize spellings of various Japanese names.
# I've left my actual settings in this guide so you can get an idea for how this works.
substitute:
  ^(.*?)( &| feat.| + | x | vs| ft| Ft).*: \1

rewrite:
    artist .*carlos eiene.*: insaneintherainmusic
    artist かめりあ: Camellia
    albumartist .*かめりあ.*: Camellia
    artist 大貫妙子: Taeko Onuki
    artist ななひら: Nanahira
    artist 坂本龍一: Sakamoto Ryuichi
    artist 小松亮太: Ryota Komatsu
    artist 長沼英樹: Hideki Naganuma
    artist .*left at london.*: Left at London
    albumartist .*大貫妙子.*: Taeko Onuki
    albumartist .*ALEX(,| &| and| +): ALEX
    albumartist .*TOKYO ROSE (,| &| and| +) ALEX.*: ALEX
    albumartist .*ALEX (,| &| and| +) TOKYO ROSE.*: ALEX
    albumartist .*Hyper Potions.* : Hyper Potions
    albumartist .*Carlos Niño.*Photay.*: Photay
    albumartist .*Aesop Rock.*: Aesop Rock
    albumartist .*Robot Koch.*: Robot Koch
    albumartist .*Kishi Bashi.*: Kishi Bashi
    albumartist .*Czarface.*: Czarface
    albumartist .*Wu‐Tang Clan.*: Wu-Tang Clan
    albumartist .*情報デスクVIRTUAL.*: Vektroid
    albumartist .*esc 不在.*: Vektroid
    albumartist .*PrismCorp Virtual Enterprises.*: Vektroid
    albumartist .*Macintosh Plus.*: Vektroid
    albumartist .*New Dreams Ltd.*: Vektroid
    albumartist .*Peace Forever Eternal.*: Vektroid
    albumartist .*Vektordrum.*: Vektroid
    albumartist .*Sacred Tapestry.*: Vektroid
    albumartist .*dstnt.*: Vektroid

web:
    host: 0.0.0.0
    port: 8337
If you edit the config manually outside the container, make sure to give it a restart (or start it for the first time if you haven't yet).
Once it's up and running, exec into the container to start using the CLI tools:
sudo docker exec -it beets bash
You can experiment with beets a lot more, but the most important tool is the “beet import” command. For example, let's say I downloaded a random track off slskd manually, not through Lidarr. It's just sitting in my slskd download folder. So let's run beets and kick off an import:
beet import slskd/*
Note the singular “beet” for the command. Yeah I hate that too.
You'll be greeted by a wall of text like this. For higher certainty matches, beets will just import immediately, but if the match is a bit fuzzy, it'll ask for some manual intervention.
root@e7f034fb4452:/# beet import slskd/Whenever\ You\ Need\ Somebody\ \(1987\)/

/slskd/Whenever You Need Somebody (1987) (1 items)

  Match (67.7%):
  Rick Astley - Whenever You Need Somebody
  ≠ missing tracks
  MusicBrainz, Digital Media, 1987, XW, RCA, None, None
  https://musicbrainz.org/release/98c0cd5f-fa84-45d9-839f-cc5d276dd5be
  * Artist: Rick Astley
  * Album: Whenever You Need Somebody
Missing tracks (9/10 - 90.0%):
 ! Whenever You Need Somebody (#2) (3:53)
 ! Together Forever (#3) (3:25)
 ! It Would Take a Strong Strong Man (#4) (3:40)
 ! The Love Has Gone (#5) (4:20)
 ! Don’t Say Goodbye (#6) (4:09)
 ! Slipping Away (#7) (3:52)
 ! No More Looking for Love (#8) (3:12)
 ! You Move Me (#9) (3:42)
 ! When I Fall in Love (#10) (3:03)
➜ Apply, More candidates, Skip, Use as-is, as Tracks, Group albums,
Enter search, enter Id, aBort?
In this example, I only have one track off this whole album in my downloads folder, so beets is asking me what I want to do. I just want this one track to be imported, so I'll just enter “A” for “Apply” and we're done. beets will then copy or move the file into your library, and Navidrome should pick it up automatically.
Note that Lidarr will also detect any newly added files to your library, so make sure to update monitoring appropriately for any imported artists.
There's a lot more this tool can do, and sometimes it can be a bit finnicky, so I highly recommend reading about it in more detail, but this should be enough to get started.
If you prefer a GUI, you can also take a look at beets-flask. I haven't tried this myself, but seems like a great option too.
metadata-remote
Sometimes beets misses things, sometimes Lidarr misses things, sometimes you just need to in and fix something by hand. My tool of choice for just that is metadata-remote, a pretty simple GUI tool for manually correcting metadata tags. I wouldn't recommend this for managing your entire library, and bulk import tools like beets and Lidarr are better suited for that, but I love MDRM for manual fixes and tagging very obscure albums.
There's not much to go over, MDRM is a very simple tool and is very easy to spin up. It has no concept of a library or individual users, so just point it at your music's root directory and go:
metadata-remote:
    image: ghcr.io/wow-signal-dev/metadata-remote:latest
    ports:
      - "8338:8338"
    volumes:
      - /mnt/unraid/media/music:/music
    environment:
      - PUID=910
      - PGID=910
    restart: unless-stopped
Discovery
Discover-style playlists are the biggest missing piece in a self-hosted music streaming setup. Frankly, nothing really comes close to the algorithms of Spotify, Tidal, and the like. That being said, ListenBrainz and last.fm create some decent playlists, and we'll be utilizing the former here in a second.
Explo
Explo is a newcomer to this space, and aims to fill this missing piece leveraging ListenBrainz's weekly “for you” playlists. This service runs on a cron job once a week and downloads the specified user's generated playlist using slskd or youtube, then creating the playlist in your backend music server instance (in our case, Navidrome).
It's important to remember that Explo is a single developer project and is pretty new as well. As such, there are a handful of limitations we'll need to work around, particularly for a multi-user setup.
Spinning up Explo is simple and pretty self-explanatory:
explo:
    image: ghcr.io/lumepart/explo:latest
    restart: unless-stopped
    container_name: explo
    volumes:
      - ./appdata/explo/user1.env:/opt/explo/.env
      - /downloads/soulseek/complete:/downloads
      - /mnt/unraid/media/music/discover/user1:/data
    environment:
      - TZ=America/New_York
      - CRON_SCHEDULE=15 00 * * 2
      - SLSKD_DIR=/downloads
      - MIGRATE_DOWNLOADS=true
      - DISCOVERY_SERVICE=listenbrainz
      - LISTENBRAINZ_USER=your_username_here
[!CAUTION]
Your ListenBrainz account needs to be configured to be in the same timezone as set in the compose, else Explo won't work correctly.
The example .env in the repository is commented quite nicely. I'll share a slimmed down version here. We're not going to be using YouTube in this configuration, if you want to do that, check the Explo wiki. As always, change the usernames, passwords, URLs, etc to fit your configuration.
DISCOVERY_SERVICE=listenbrainz
LISTENBRAINZ_USER=your_username_here
LISTENBRAINZ_DISCOVERY=playlist
EXPLO_SYSTEM=subsonic
SYSTEM_URL=http://navidrome:4533
SYSTEM_USERNAME=xxx #Navidrome Admin user
SYSTEM_PASSWORD=xxx
DOWNLOAD_SERVICES=slskd
SLSKD_URL=http://slskd:5030
SLSKD_API_KEY=xxx
SLSKD_RETRY=5
SLSKD_DL_ATTEMPTS=5
MIGRATE_DOWNLOADS=true
SLSKD_DIR=/downloads
DOWNLOAD_DIR=/data
EXTENSIONS=flac,mp3
SINGLE_ARTIST=true
DEBUG=true
Then just bring up explo with sudo docker compose up -d and it'll do its thing. Of course, since it runs on a cron job, you might want to test it manually. To run it manually, you can just exec into the container and run the explo command:
sudo docker exec -it explo /opt/explo/explo
And that's pretty much all there is to it.
For multiple users, things do get a little more complicated:
- A separate Explo instance should run for each user, pointing to separate env files.
- Since you're sharing an slskd instance, you should space out your
CRON_SCHEDULEsettings. My second user runs 2 hours after my first to be safe.- It's not really necessary, but I like to keep my slskd directory clean, so I have a deletion call stuck in my crontab right in between the explo runs. For example:
0 1 * * 2 rm -r /downloads/soulseek/complete/*
0 1 * * 2 rm -r /downloads/soulseek/incomplete/*
- Also note that Explo needs an admin user for Navidrome - this is so it can kick off a library scan. The created playlist however is then assigned to the admin user. You'll need to manually log in to Navidrome as the admin user to reassign these playlists to their respective users. Hopefully this is cleaner in the future, for now it's just something to live with.
- Finally, Explo won't download tracks that already exist in the library, which makes sense, but this does become a small issue if one user's playlist has tracks that another user has in their library. Explo will see these tracks through the Navidrome admin user so it won't download them, but the user won't actually be able to access these tracks once the playlist is assigned to their account. A feature does seem to be on the roadmap to always force downloads, so once that's available, it should be used for multi-user setups.
Wrapping up
With everything said and done, we now have a fully functioning multi-user self-hosted music system. As I've said over and over again, I'm not an expert and I don't claim this to be the best path forward, this is just something I've been putting together and I've been happy with. Hopefully this helps someone out there get their own stack up and running. Please let me know if I've missed anything, or if you have any questions, suggestions, or recommendations!